 Moto Guzzi V85 TT - Service manual > Component maintenance
- The vehicle is equipped with two-channel ABS. In other words, it works on both the front and rear wheel. Periodically and each time the wheels are remounted, the phonic wheel or the sensor is replaced, it is important to check that the distance is consistent over all 360Âş. To do this, use a feeler gauge and check the distance between the sensor and the phonic wheel on three points at a distance of 120Âş.
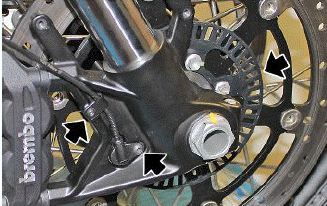
CAUTION IF THE READINGS SHOULD RETURN A VALUE OUTSIDE OF THE FIELD OF TOLERANCE, REPLACE THE SENSOR AND/OR THE PHONIC WHEEL AND REPEAT THE CHECK IN ORDER TO ENSURE THAT THE VALUES FALL WITHIN THE FIELD OF TOLERANCE.
Characteristic
Distance between tone wheel and front sensor 0.1 - 3.17 mm (0.004 - 0.125 in) Distance between tone wheel and rear sensor 0.1 - 3.10 mm (0.004 - 0.122 in)
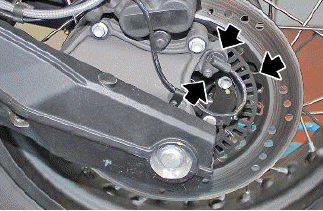
CLEANING THE PHONIC WHEELS
- It is important to check that both phonic wheels are always clean. If not: delicately remove any dirt residues using a cloth or wire brush. Do not use solvents or abrasive substances and do not direct air or water jets directly on the phonic wheel.
REPLACING THE PHONIC WHEEL SENSOR
- Disconnect the front phonic wheel sensor connector from the main wiring harness. Unscrew and remove the screws and remove the phonic wheel sensor
CAUTION BEFORE REFITTING, ENSURE THAT THE CONTACT SURFACES BETWEEN THE SENSOR AND THEIR SEATS ARE FREE OF IMPERFECTIONS AND PERFECTLY CLEAN.
ALWAYS CHECK THE DISTANCE BETWEEN THE SENSOR AND THE PHONIC WHEEL.
Removal
- Connect the bleeder bottles to the calliper bleeder screw and open
- Press the lever down as far as it will go and block it in position using a clamping device in order to prevent the liquid from escaping from the system when it is open.
- Close the calliper bleeder screw and remove the bleeder bottle.
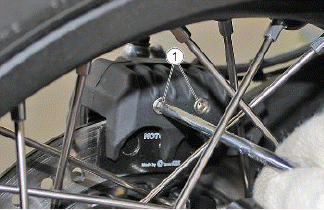
- Loosen the two grub screws (1)
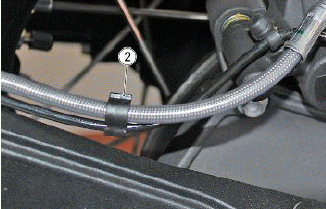
- Free the brake calliper line from the cable grommet (2)
- Unscrew and remove the joint screw (3) from the rear calliper
- Unscrew and remove the screws (4)
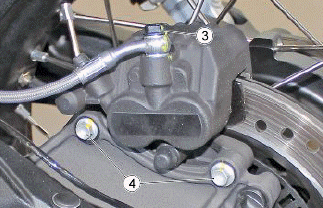
- Remove the rear calliper (5)
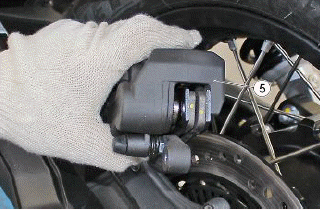
Installing
- Remove the rear brake calliper
- Correctly position the new rear brake calliper (1) on the brake disc
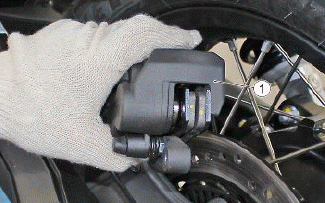
- Insert and tighten the screws (2)
- Position the brake line, insert and tighten the screw (3)
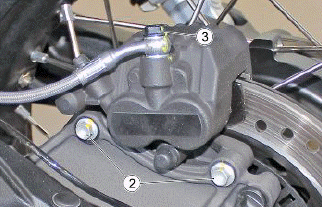
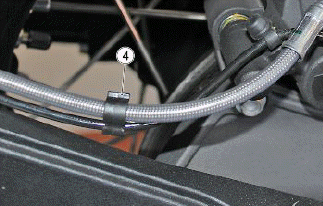
- Hook the brake line into the cable grommet (4)
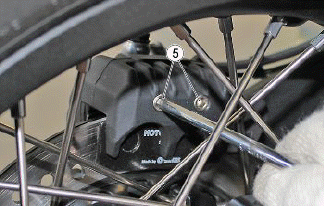
- Insert and tighten the two grub screws (5)
- Remove the clamp from the brake pedal.
- Remove the brake fluid reservoir cap and fill it with new brake fluid
CAUTION PERFORM THE STANDARD BRAKING SYSTEM BLEEDING PROCEDURE, AS DESCRIBED AT THE END OF THE CHAPTER.
- Top up the fluid reservoir and refit the cap
- Check the stroke and sensitivity of the brake pedal
- If the brake pedal stroke is too long after carrying out the bleeding procedure, check the braking system for leaks and, if none are found, bleed the system using the diagnostic instrument, as described
- Disconnect the flexible bleeder pipes and re-tighten the bleeder screws, applying the correct torque
Removal
The following procedure is described for a single calliper, but is valid for both front brake callipers.
- Connect the bleeder bottles to the calliper bleeder screw and open
- Press the lever down as far as it will go and block it in position using a clamping device in order to prevent the liquid from escaping from the system when it is open.
- Close the calliper bleeder screw and remove the bleeder bottle.
- Unscrew and remove the joint screw (1) from the front calliper
- Unscrew and remove the two screws (2)

- Remove the front brake calliper (3)
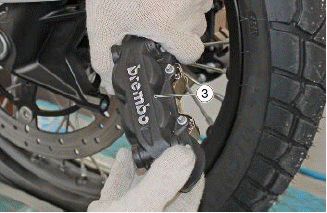
Installing
- Remove the front brake calliper
- Correctly position the new front brake calliper (1) on the brake disc
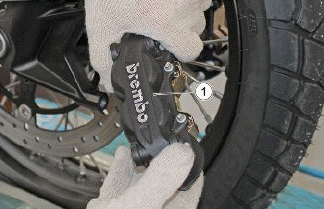
- Insert and tighten the screws (2)
- Position the brake line on the brake calliper and insert and tighten the screw (3)
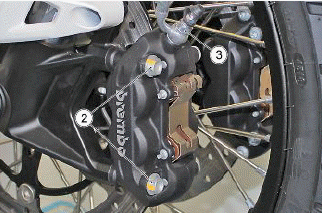
- Remove the clamp from the front brake lever.
- Remove the brake fluid reservoir cap and fill it with new brake fluid
CAUTION PERFORM THE STANDARD BRAKING SYSTEM BLEEDING PROCEDURE, AS DESCRIBED AT THE END OF THE CHAPTER.
- Top up the fluid reservoir and refit the cap
- Check the stroke and sensitivity of the brake lever
- If the brake lever stroke is too long after carrying out the bleeding procedure, check the braking system for leaks and, if none are found, bleed the system using the diagnostic instrument, as described
- Disconnect the flexible bleeder pipes and re-tighten the bleeder screws, applying the correct torque
See also:
 Moto Guzzi V85 TT - Service manual > Modulator
REMOVAL Remove the engine from the vehicle PREPARING THE VEHICLE Connect the bleeder bottles to the front and rear calliper bleeder screws and open them. Press the front brake lever and the rear brake pedal as far as they will go and block them in position using the clamping devices. Close the front and rear calliper bleeder screws and remove the bleeder bottle Mark a reference on the pipes and on the ABS control unit to avoid inverting them when refitting Undo and remove the screw (1) Undo and remove the screw (2) Remove the support bracket (3) Disconnect the connector (4) Unscrew and remove the screws (5) Remove the ABS control unit (6)
 Moto Guzzi V85 TT - Service manual > Disc Inspection
FRONT CAUTION THE FRONT BRAKE DISC SHAPE DOES NOT CHANGE THE OPERATING AND MAINTENANCE SPECIFICATIONS OF THE SYSTEM. The following operations must be carried out with the brake discs fitted on the wheel; they refer to a single disc, but are valid for both. Check the disc for wear by measuring the minimum thickness with a micrometer in different points. If the minimum thickness, even in a single point of the disc, is less than the minimum value, replace the disc.
 Ducati Scrambler
 Fantic Caballero 500
 Indian FTR 1200
 Moto Guzzi V85 TT
 Royal Enfield Bullet Trials Works Replica
 Triumph Scrambler 1200 XE
 Triumph Street Scrambler
 Yamaha XSR700
 Ducati Scrambler 800
 Moto Guzzi V85 TT
 Triumph Scrambler 1200 XC