 Ducati Scrambler 800 - Service manual > Entering PIN CODE function for overriding purposes
In case of key acknowledgement system or key malfunction, the instrument panel allows the user to enter his/her own PIN CODE to temporarily restore motorcycle operation.
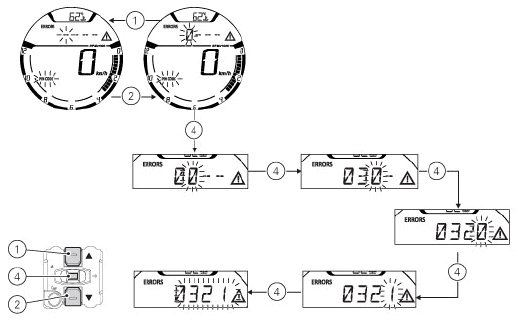
If upon key-on an Immobilizer ERROR occurs, the instrument panel automatically activates in MENU 1 the possibility to enter the four-digit PIN CODE previously memorised with the relevant function in the Setting Menu, PIN page.
Entering the code (A):
- Press button (2) or (1), only one digit indicating "0" starts flashing;
- Each time you press button (2) the displayed number increases by one (+ 1) up to "9" and then starts back from "0";
- Each time you press the button (1) the displayed number decreases by one (- 1) up to "1" and then starts back from "0";
- To confirm the number, press the button (4);
Repeat the procedures until you confirm all the digits of the PIN CODE.
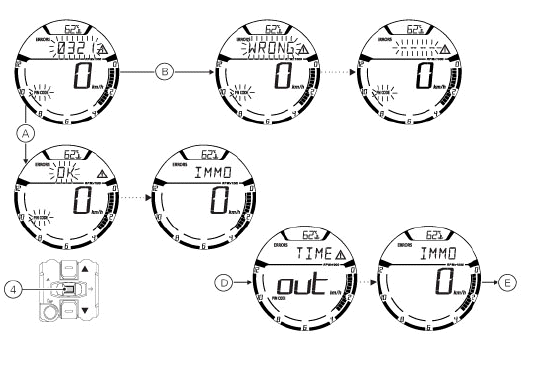
When you press button (4) to confirm the fourth and last digit:
- if the PIN code (A) is correct, the instrument panel shows the message OK for 2 seconds followed by the "standard screen" and enables the vehicle to start (C);
- if the PIN code (B) is not correct, the instrument panel displays WRONG for 2 seconds and then highlights the string of four dashes "- - - -" to allow you to try again. The number of possible attempts is unlimited and determined by a preset time-out of 2 minutes (D). After 2 minutes, the instrument panel shows the standard screen and does not allow the vehicle to start (E).
Important If this procedure is necessary in order to start the motorcycle, contact an Authorised Ducati Service Centre as soon as possible to fix the problem.
Note The vehicle can be started until a Key-Off is performed. If the problem still persists upon the next starting attempt, repeat the procedure from the beginning in order to start the motorcycle temporarily again.
Key duplication
When a customer needs spare keys, he/she shall contact a Ducati authorised service centre and bring all keys he/she still has.
The Ducati authorised service centre will program all new and old keys.
The Ducati authorised service centre may ask to the customer to prove to be the motorcycle owner.
The codes of the keys missing during the programming procedure will be erased to ensure that any lost key can not start the engine.
Note If the motorcycle owner changes, it is necessary that the new owner is given all keys.
Operation
Every time you turn the key from ON to OFF, the protection system activates the engine block. If also in this case you are not able to start the engine, contact an authorised Ducati service centre.
Warning Strong impacts could damage the electronic components inside the key. During the procedure always use the same key. Using different keys may prevent the system from acknowledging the code of the inserted key.
Keys
The motorcycle comes with 2 keys.
They contain the "Immobilizer system code".
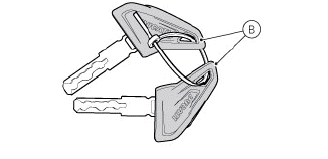
Keys (B) are those for the standard use, i.e. to:
- start the engine;
- open the fuel tank plug;
- open the seat lock.
Warning Separate the keys and use only one of the two to ride the bike.
Immobilizer system
To increase protection against theft, motorcycle features an electronic engine locking system (IMMOBILIZER) which is automatically enabled upon every Key-Off. Inside of each key handgrip there is an electronic device that modulates the signal sent by a special antenna integrated in the ignition switch upon starting. Such modulated signal represents the "password", that changes upon every starting, that allows the control unit to acknowledge the key and thus starting the engine.
Activations through diagnosis instrument
The DUCATI diagnosis instrument allows performing a series of activations to check some instrument panel functions and resetting parameters or warning lights.
After each activation, the instrument panel will restore its standard functions.
Note The activations must be performed only with key turned to ON, engine off and battery voltage ≥ 11.0 V.
Immobilizer (keys) reset
This activation allows "erasing" the "keys" to reprogramme the Immobilizer System.
Upon receiving this request, the instrument panel resets the previously stored keys.
Upon next Key-On, the Immobilizer System will be "virgin" and it will be possible to reprogramme new keys.
Programming the Immobilizer System
When replacing the instrument panel with a new one or when reprogramming the Immobilizer System (because one or both keys got lost).
If the System is "virgin", upon Key-On the instrument panel immediately activates the "Immobilizer Programming" mode.
Programming procedure:
- insert KEY 1 (one of the two black keys) and turn the key from Off to On;
- within 3 seconds turn the key from On to Off;
- within 15 seconds insert KEY 2 (the other black key) and turn the key from Off to On;
- within 3 seconds turn the key from On to Off;
- within 15 seconds insert KEY X again (no matter if Key 1 or Key 2) and turn the key from Off to On.
- If the procedure was successful the instrument panel shows "PROG." and "OK" for 3 seconds and then switches to the standard display mode.
Light control
Low / High beam
This function allows you to reduce current consumption from the battery, by managing headlight switching-on and off.
Upon Key-On, low and high beams remain off (OFF).
By starting the engine, the low beam will be automatically activated; from now on, the "standard" operation will become active, i.e. it will be possible to switch from low to high beam by pressing button (3) in position (V) or use the "FLASH" function by pressing button (3) in position (O). If engine is not started upon key-on, it is anyway possible to switch the lights on by pushing the button on the LH high/low beam switch: button (3) in position (V).
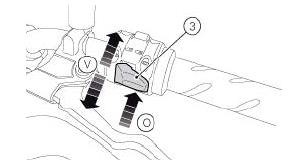
The low beam lights are turned on the first time it is pressed; from this moment, the same button can be used to switch on (and off) the high beam light: if the engine is not started within 60 seconds, the low beam and high beam that were turned on will turn off. If the headlight was turned on before starting the engine with the procedure described above, the headlight will turn off automatically when starting the vehicle and will turn ON again when the engine has been completely started.
Turn indicators
Turn indicators are automatically controlled by the instrument panel.
After activating one of the two turn indicators, user can disable them using button (see Fig 1) 3, on the left switch.
If the turn indicator is not reset manually, the instrument panel will automatically switch it off after the motorcycle has travelled 500 m (0.3 miles) from when the turn indicator was activated. The counter for the distance travelled for automatic deactivation is only activated at speeds below 80 km/h (50 mph).
If the calculation of the distance for automatic deactivation is activated and then the motorcycle exceeds a speed of 80 km/h (50 mph), the calculation will be interrupted and will restart when the speed returns below the indicated threshold.
Hazard function
The "Hazard" function turns all four turn indicators on at the same time to signal an emergency condition.
The "Hazard" function is activated by taking button (3) to position (6) for 3 seconds. Activation is only possible when motorcycle is ON (i.e. when key is turned to "ON" while engine status does not matter).
When the "Hazard" function is active, all four turn indicators blink at the same time as well as warning lights (7) on the instrument panel. The "Hazard" function can be disabled both with motorcycle on (key set to "ON") - by taking button (3) to position (6) or by taking button (3) to its central position - and with motorcycle off (key set to OFF) by taking button (3) to position (6).
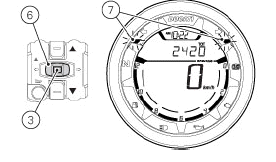
After activating the "Hazard" function, if motorcycle is switched OFF (key set to OFF), the function will stay active until manually disabled by user or it will be automatically disabled after 120 minutes (2 hours) to save battery charge.
See also:
 Ducati Scrambler 800 - Service manual > Setting the units of measurement
This function allows changing the units of measurement of the displayed values. To manually set the units of measurement, you must enter the SETTING MENU. Select UNITS option, by pressing button (1) or (2). Once function is highlighted, press CONFIRM MENU button (4).
 Ducati Scrambler
 Fantic Caballero 500
 Indian FTR 1200
 Moto Guzzi V85 TT
 Royal Enfield Bullet Trials Works Replica
 Triumph Scrambler 1200 XE
 Triumph Street Scrambler
 Yamaha XSR700
 Ducati Scrambler 800
 Moto Guzzi V85 TT
 Triumph Scrambler 1200 XC