 Moto Guzzi V85 TT - Service manual > Bleeding the braking system
PREPARING THE VEHICLE
- It is important to ensure that there is always a sufficient quantity of brake fluid in the tank.
- These operations may be simplified by using a bleeding device when carrying out the "Replacing the brake fluid" operations
- In this case, when performing the bleeding procedure, it is also necessary to operate the brake pedal a few times with the bleeder device connected (approximately five times for each wheel circuit).
FRONT/REAR BRAKE MASTER CYLINDER PRELIMINARY OPERATIONS
- Replace the damaged brake master cylinder with a new one
- Connect the brake line to the new brake master cylinder
- Fill the reservoir with new brake fluid
CAUTION PERFORM THE STANDARD BRAKING SYSTEM BLEEDING PROCEDURE, AS DESCRIBED AT THE END OF THE CHAPTER.
- Top up and refit the cap
- Check the stroke and sensitivity of the brake pedal and lever
- If the brake pedal or lever stroke is too long after carrying out the bleeding procedure, check the braking system for leaks and, if none are found, bleed the system using the diagnostic tool, as described.
- Disconnect the flexible bleeder pipes and re-tighten the bleeder screws, applying the correct torque
BLEEDING SYSTEM WITH DIAGNOSTICS INSTRUMENT
This type of bleeding has to be carried out if after all the checks the brake lever and the pedal are still spongy.
The operations described here are valid for both systems even though the description refers to the front system.
FRONT
- With diagnostics instrument properly connected, select the function "FRONT BRAKE BLEEDING PROCEDURE".
- The pump starts rotating.
- While the pump is performing a rotation cycle, operate and release the front brake lever until the message diagnostics instrument cycle completion is received.
- This procedure allows the air to turn and to accumulate.
- Once the procedure with diagnostics instrument is finished, perform the REGULAR BLEEDING to remove the air from the system completely.
CAUTION PERFORM THE STANDARD BRAKING SYSTEM BLEEDING PROCEDURE, AS DESCRIBED AT THE END OF THE CHAPTER.
Front
Any air trapped in the hydraulic circuit acts as a cushion, absorbing much of the pressure applied by the brake pump and minimising the braking power of the calliper.
The presence of air is signalled by the "sponginess" of the brake and by poor braking.
IN VIEW OF THE DANGER THIS POSES FOR VEHICLE AND RIDER, THE HYDRAULIC CIRCUIT MUST BE BLED AFTER REFITTING THE BRAKES AND RESTORING THE BRAKING SYSTEM TO ITS NORMAL OPERATING CONDITIONS.
NOTE THE FOLLOWING OPERATIONS REFER TO ONE FRONT BRAKE CALLIPER ONLY, BUT ARE VALID FOR BOTH. THE VEHICLE MUST BE ON LEVEL GROUND TO BE BLED. WHILE BLEEDING THE HYDRAULIC SYSTEM, FILL THE RESERVOIR WITH THE NECESSARY QUANTITY OF BRAKE FLUID. CHECK THAT, DURING THE OPERATION, THERE IS ALWAYS BRAKE FLUID IN THE RESERVOIR.

- Remove the rubber protection cover of the bleed valve.
- Insert the transparent plastic pipe in the front brake calliper bleed valve and slide the other end of this pipe in a container to collect the fluid.
- Remove the front brake fluid reservoir cap.
- Quickly press and release the front brake lever several times and then keep it fully pressed.
- Loosen the bleed valve by a 1/4 turn so that the brake fluid flows into the container, this will release the tension on the brake lever, risking making it arrive at the end stop.
- Close the bleed valve before arriving at the end of the stroke with the lever.
- Repeat the operation until the are no air bubbles in the fluid going into the container.
NOTE WHILE BLEEDING THE HYDRAULIC SYSTEM, FILL THE RESERVOIR WITH THE NECESSARY QUANTITY OF BRAKE FLUID. CHECK THAT, DURING THE OPERATION, THERE IS ALWAYS BRAKE FLUID IN THE RESERVOIR.
- Screw the bleeding valve and remove the pipe.
- Top-up the reservoir until the correct brake fluid level is obtained.
- Refit and block the front brake oil reservoir cap.
- Refit the rubber protection cover.

Rear
Any air trapped in the hydraulic circuit acts as a cushion, absorbing much of the pressure applied by the brake pump and minimising the braking power of the calliper.
The presence of air is signalled by the "sponginess" of the brake and by poor braking.
CAUTION IN VIEW OF THE DANGER THIS POSES FOR VEHICLE AND RIDER, THE HYDRAULIC CIRCUIT MUST BE BLED AFTER REFITTING THE BRAKES AND RESTORING THE BRAKING SYSTEM TO ITS NORMAL OPERATING CONDITIONS. THE VEHICLE MUST BE ON LEVEL GROUND TO BE BLED. WHILE BLEEDING THE HYDRAULIC SYSTEM, FILL THE RESERVOIR WITH THE NECESSARY QUANTITY OF BRAKE FLUID. CHECK THAT, DURING THE OPERATION, THERE IS ALWAYS BRAKE FLUID IN THE RESERVOIR.
- Remove the rubber protection cover of the bleed valve.
- Insert the transparent plastic pipe in the rear brake calliper bleed valve and insert the other end of this pipe into a container to collect the fluid.
- Remove the rear brake fluid reservoir cap.

- Repeatedly quickly pull and release the rear brake lever, then keep it fully pulled.
- Loosen the bleed valve by a 1/4 turn so that the brake fluid flows into the container, this will release the tension on the brake lever, risking making it arrive at the end stop.
- Close the bleed valve before arriving at the end of the stroke with the lever.
- Repeat the operation until the are no air bubbles in the fluid going into the container.
NOTE WHEN BLEEDING THE HYDRAULIC SYSTEM, FILL THE TANK WITH BRAKE FLUID WHEN NECESSARY CHECK THAT DURING THE OPERATION THERE IS ALWAYS BRAKE FLUID.
- Screw the bleeding valve and remove the pipe.
- Top-up the reservoir until the correct brake fluid level is obtained.
- Refit and lock the rear brake oil reservoir cap.
- Refit the rubber protection cover.

Removal
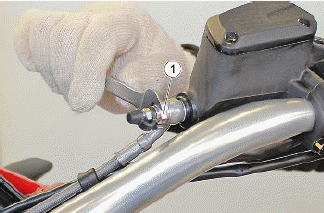
- Undo and remove the joint screw (1) from the front brake master cylinder after placing a suitable container underneath to collect the brake fluid
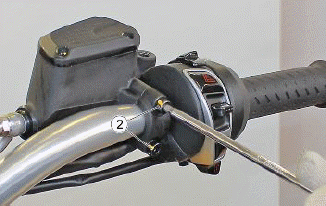
- Unscrew and remove the screws (2)
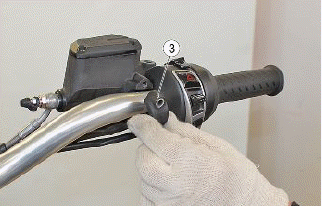
- Remove the U-bolt (3)
- Unscrew and remove the two screws (4)

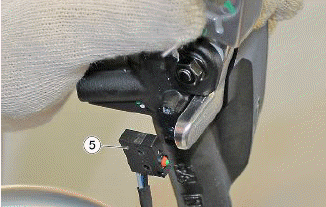
- Remove the sensor (5) from the front brake master cylinder
- Remove the front brake master cylinder (6)
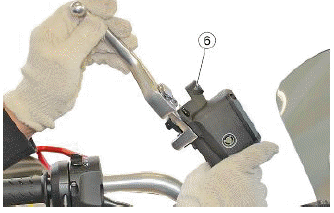
Remove
- Unscrew and remove the two screws (1)
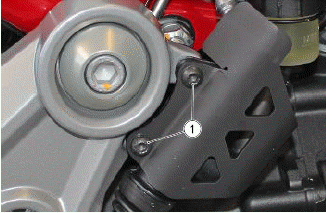
- Remove the protection cover (2)

- Undo and remove the joint screw (3) from the rear brake master cylinder after placing a suitable container underneath to collect the brake fluid.
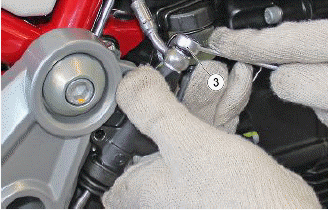
- Remove the rear brake master cylinder (4)
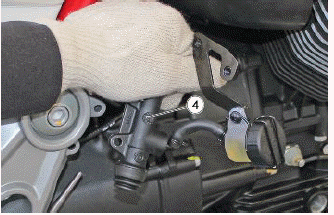
REAR BRAKE FLUID RESERVOIR REMOVAL
- Remove the rear brake master cylinder
- Undo and remove the screw (1)
- Retrieve the support bracket (2)
- Remove the hose guide (3)
- Remove the brake fluid reservoir (4)

REMOVING THE REAR MASTER CYLINDER PLUNGER
- Slide out the O-ring gasket (1) to free the locking clip
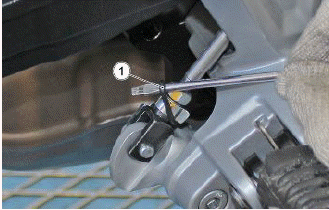
- Remove the locking clip (2)
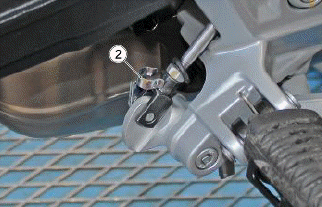
- Remove the rear brake master cylinder plunger (3)
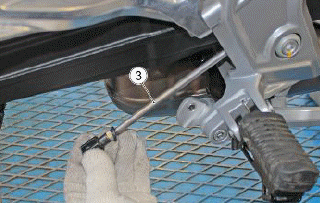
See also:
 Moto Guzzi V85 TT - Service manual > Disc Inspection
FRONT CAUTION THE FRONT BRAKE DISC SHAPE DOES NOT CHANGE THE OPERATING AND MAINTENANCE SPECIFICATIONS OF THE SYSTEM. The following operations must be carried out with the brake discs fitted on the wheel; they refer to a single disc, but are valid for both. Check the disc for wear by measuring the minimum thickness with a micrometer in different points. If the minimum thickness, even in a single point of the disc, is less than the minimum value, replace the disc.
 Ducati Scrambler
 Fantic Caballero 500
 Indian FTR 1200
 Moto Guzzi V85 TT
 Royal Enfield Bullet Trials Works Replica
 Triumph Scrambler 1200 XE
 Triumph Street Scrambler
 Yamaha XSR700
 Ducati Scrambler 800
 Moto Guzzi V85 TT
 Triumph Scrambler 1200 XC